The
Baby Print Impression Process
A
step-by-step procedure on how to get the perfect impression
of your baby's hand or foot print.
Key
Points for a successful impression resulting in an awesome
Baby-Print:
1.
Play-doh must be smooth, flat, and level.
2. Leave a minimum of 1"
margin between the hand/foot impression and the sides of
the container.
3. Hand or foot impression
depth should be 1/4" to 3/8".
4.
Label your impression container and lid with your name.
Remember,
what you see in your impression is what you get in your
Baby-Print.
|
|
| What
you need |
|
|
|
You
will need an impression kit. You can make your
own, or buy one from us (with purchase of Baby-Print - see
"Order" page). An impression
kit includes a container with a lid pre-packed with Play-doh,
a mini rolling pin, and instructions.
Container:
Make sure your container is big enough so that the hand or
foot does not come in contact with the edges of the container.
Make sure it has a lid that seals well. Sandwich containers
work really well because they are big enough for the biggest
baby feet and they fit very well into a small flat-rate Priority
mail box.
Play-doh:
Homemade Play-doh works very well. See recipe below if you
decide to make your own Play-doh. Any color of store-bought
Play-doh will work.
Rolling
pin (optional):
You can use a rolling pin to smooth and flatten your Play-doh
after you press it into the container. A piece of PVC pipe
works well. Your fingers will do the trick also.
|
|
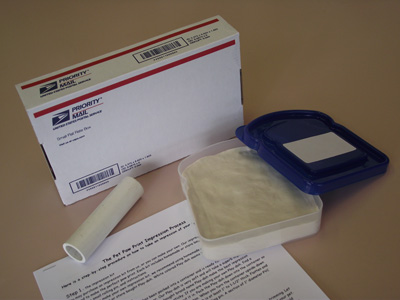
The Baby-Print impression kit. |
|
| Step
1 - prepare the Play-doh |
|
|
|
If
your Play-doh seems a bit hard, put it into the microwave
for about 30 seconds to soften it. Knead the Play-doh and
then pack it down into the container so that it will stick
to the bottom. Push down along the edges too. When you turn
the container upside-down the Play-doh should not move or
fall out. This must be done so that the Play-doh will not
dislodge during shipping. Make sure the Play-doh is at least
1" thick.
Very
important: for great Baby-Print results, make the
surface of the Play-doh as flat and smooth as possible. Use
a mini rolling pin, or your fingers. Also keep the Play-doh
level in the container as shown in the photo.
Common
questions:
Should I use store-bought Play-doh or homemade Play-doh? If
you are sending your impression from England or some place
far away and the impression will take a couple of weeks to
arrive, then use store-bought Play-doh. Also use store-bought
Play-doh if you plan to store your impression for any time
before sending it to us. Use homemade Play-doh if you are
going to send the impression right away and you live within
the United States. Reason: home-made Play-doh can get moldy
over time if not refrigerated or frozen.
|
|
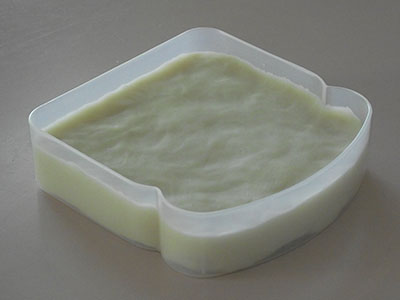
A perfect imression container
with homemade Play-doh flattened and smoothed using my thumbs.
Notice the Play-doh surface is level all the way around the
container. |
|
| Step
2 - take the impression |
|
|
|
Hands
and feet must be clean.
It is much easier to get the paw impression with two people.
One person can hold the baby in their arms while the second
person simply pushes the Play-doh container into the baby's
hand or foot. It is best to gently push each finger or toe
slightly down into the Play-doh to be sure all them make an
impression. Gently pull the hand or foot out of the Play-doh.
The impression should be between than 1/4" to 3/8"
deep.
|
|
|
|
| Step
3 - make sure you got a good impression |
|
Evaluate
your impression. The photo shows what your baby's (paw used
for an example) impression should look like. The impression
should be as close to the center of the container as possible.
There should be at least a 1" margin between the impression
and the sides of the container. You should be able to see
all 5 fingers or toes. The overall impression depth should
be approximately 1/4" to 3/8" deep. There should
still be Play-doh material underneath the impression. If any
part of your baby's hand or foot touched the bottom or the
sides of the container, the impression should be taken over
again. Some fingers or toes may press into the Play-doh deeper
than others, or one may be positioned away from the others.
This makes for a unique and interesting Baby-Print. Don't
worry if the first one doesn't come out looking just right,
you can always retake the impression again.
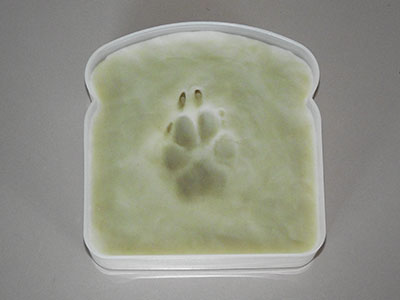
Molly's perfect paw impression.
It is centered well and not too deep with nice wide margins
between the paw impression and the container edges.
|
|
Impression
retake:
If
you think that you need to retake the impression, simply
remove all the Play-doh from the container. Knead it or
heat it in the microwave if it is not soft enough. Pack
it firmly back into the container and smooth out the surface
with your fingers or with a mini rolling pin. Remember that
taking an impression should be a fun experience for you
and your baby. Have patience. If your baby is unsure about
the whole ordeal, try using a distraction. Impression taking
is easier with two people. Babies don't seem to like touching
cold Play-doh. Try warming it up before taking the impression.
A
word to the wise: Two impressions are
better than one. Take a second impression to keep as a back-up
just in case the impression you send to us gets lost or
damaged in the mail.
If you have questions or need some technical support, don't
hesitate to call us or send an email, we're here to help.
509-553-3842
tracy@starsunmoon.com
|
|
| Step
4 - send your impression to me |
|
After
you have your baby's paw print impression, seal the container
with the lid. This will keep the Play-doh from drying out.
Label both lid and container with your name. Store in the
refrigerator until you are ready to ship. Play-doh impressions
may also be stored in the freezer for long-term storage. When
ready to ship, pack the container in a box so that it will
not shift or get crushed when en route in the postal system.
Do not pack any material between the impression surface and
the lid of the container.
Send
it to:
Baby-Prints
20421 SR 194
Pullman, WA 99163
|
|
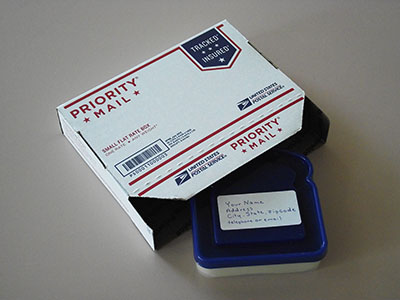
Label your impression
container and send it to us.
|
|
| Play-doh
Recipe |
|
|
|
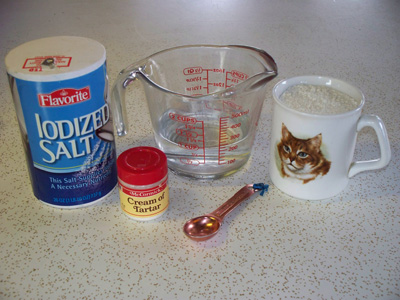
*
1 cup flour
* 1 cup warm water
* 2 teaspoons cream of tartar
* 1 teaspoon oil
* 1/4 cup salt
Mix
all ingredients. Stir over medium heat until smooth. The dough
will get very lumpy as it "cooks" just keep stirring
and it will eventually turn into one big ball of Play-doh.
Remove from pan and knead until blended smooth - make sure
there are no lumps. Be careful, it's hot! Place in plastic
bag or airtight container when cooled. Keep in refrigerator.
Will last for a long time.
|
|
|